Sometimes I pose the following question: “Why couldn’t things be simpler?”
And here is the answer: Because if they were, what would there be to fill our life with grief, ragged tympanums, sandy throats and broken walls?
After gathering all of my data on how to tap, I decided to go into Sprutcam and enter the threading operation only to find out it was compiling without doing anything at all. That is, the process was being generated with an empty set of steps. Needless to say, this wasn’t going to work very well…
I do have to admit that the ability to see a simulation is crucial! To have had to go through this nightmare without actually seeing what the program was attempting to do would have taken way much more than the close to two hour that it shaved from my life.
But anyway, here is what happened:
After selecting my centers as you normally do (Double click on one of the half surfaces of the holes you want to apply the Hole Machining operation and press Center under the Job Assignment tab) I chose the tool as my #8-32 Tap. It looks something like this:
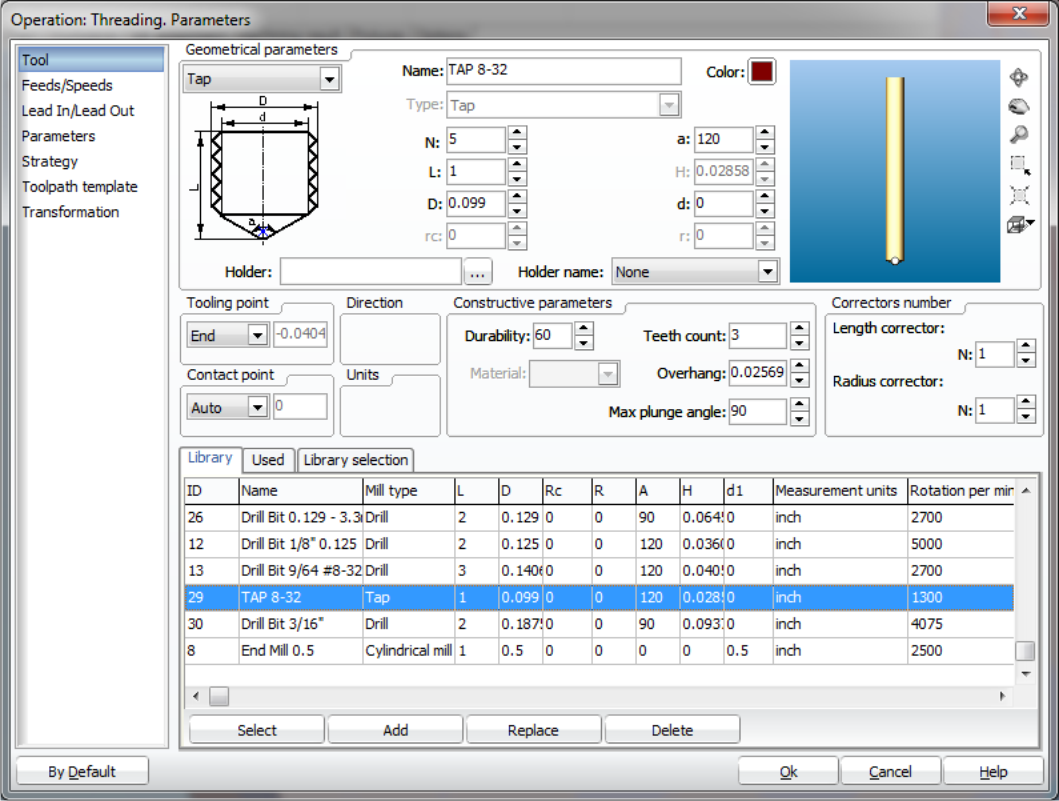
If you are a CAMing expert, you will be able to spot what the problem is by just looking at this page. If so, you will be able to correct the issue in seconds. Perhaps this is why it took me anywhere in between 3600 to 7200 seconds (across two days of pulling my hair) to finally figure this out. I will get back to this…
Next step is to select the Feeds and Speeds. This is where most of the documentation on the web is available and it is also one of the topics from my previous post. Pretty much everything out there will tell you to use 300 RPM, but after reading on some forums, this appears to be too slow a speed rate. Anyway, there are tables and there are pieces of software which will tell you what RPM to choose. Then you divide this number of RPM by the thread pitch, and that is your feed. In my case I chose 800 RPM, and since this is an 8-32 screw, 800RPM/32TPI = 25 IPM.

Finally, we need to select the actual strategy which is the tab where we specify the “tapping” operation. There really is not that much to it. By following Tormach’s recommendation, all we need to do is make every value equal to zero, except the dwell time which should be 0.3 seconds. Everything else (not shown on the picture for some weird capturing reason) is as default.

If everything is right, you should just be able to press the “RUN” button and get it over with, right? Err, wrong! Because as it turns out, everything is NOT right. As I detailed earlier, there is a bug in one of the previous screens. Were you able to spot it? Let me show you the result, which is so frustrating here is where the wall banging session begins…
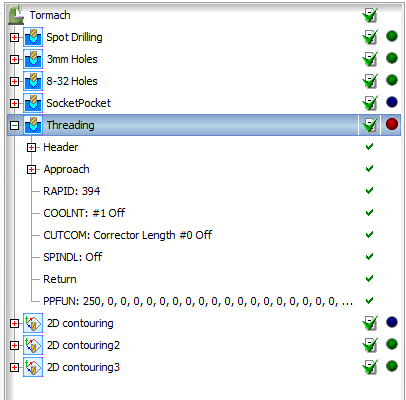
Notice there is nothing below the Threading operation. You may be wondering what do I mean by nothing when clearly there is something there. Well, not really. The stuff you see here is basically a preamble. In this case, a preamble to NOTHING! What you want to see is this:
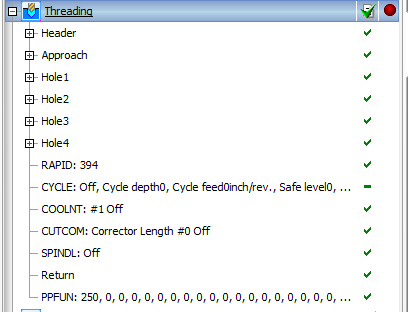
As you can see, Sprutcam has now applied the Threading operation to my 4 holes, whereas on the previous instances there were no holes to be found. What an A HOLE!!! But as it turns out, it was me the A Hole, or in this case the idiot not realizing there was a bug in my programming.
Let me give you a list of what it isn’t so you don’t waste your time trying all of these alternatives on your next tapping endeavor:
1. It is not a bug with Sprutcam.
2. It is not a matter on how you select the hole centers. You still do it like you have been doing it before and you do not need to select both half surfaces of the screw. One is all you need!
3. You do not need to modify the hole properties on the Hole Editing window.
4. You do not need to…
You know what? I bet what you want to know is what is the frigging bug and what are all of the things that I tried to no avail.
The bug is actually quite simple! If you go back to the tool selection picture, you will notice my tap has a diameter of 0.099″. This is a copy+paste error from when I copied the #6-32 tap into the new #8-32 tap. The problem is that to make an #8-32 threaded hole, you need a 0.140″ drill. If you tell Sprutcam to use a tap that is way smaller than this already existing hole (e.g. 0.099″), then Sprutcam is going to say:
“Well, I would run this operation but there is no material to be removed, so I am just going to skip it.”
WHAMMO!!!!!! I would be pissed at Sprutcam, but as it turns out this is the right answer. Why would you work arduously in doing something which is already done? The solution then is to specify the tab to have a diameter larger than the existing hole so that Sprutcam can be happy and feel like it is removing some material with the tap. Hey! SW suites also want to be happy!
What eventually solved the problem for me was to use a tap diameter of 0.14″. And with that I can now finally go to the machine and get the darned part manufactured. I was supposed to finish all of this on Friday, but Sunday will have to do. Long day ahead, so let me get busy!